TL;DR
Acoustic dampening is about controlling reflections inside a small space, while soundproofing blocks sound from escaping. Moving your rig into a closet with proper ventilation can be the best noise solution, provided you manage heat and airflow. Placement and treatment choices should focus on reflection points and sealing gaps for real results.
Think a closet is just for clothes? Think again. It can become a surprisingly effective home studio, but only if you understand the difference between dampening, treatment, and soundproofing.
Most people reach for foam panels first, but that’s like putting a bandaid on a leak. The real game-changers are placement, sealing cracks, and managing heat. When you get these right, your closet transforms from a noisy echo chamber into a controlled, quiet space perfect for recording or working without disturbing others.
Acoustic dampening
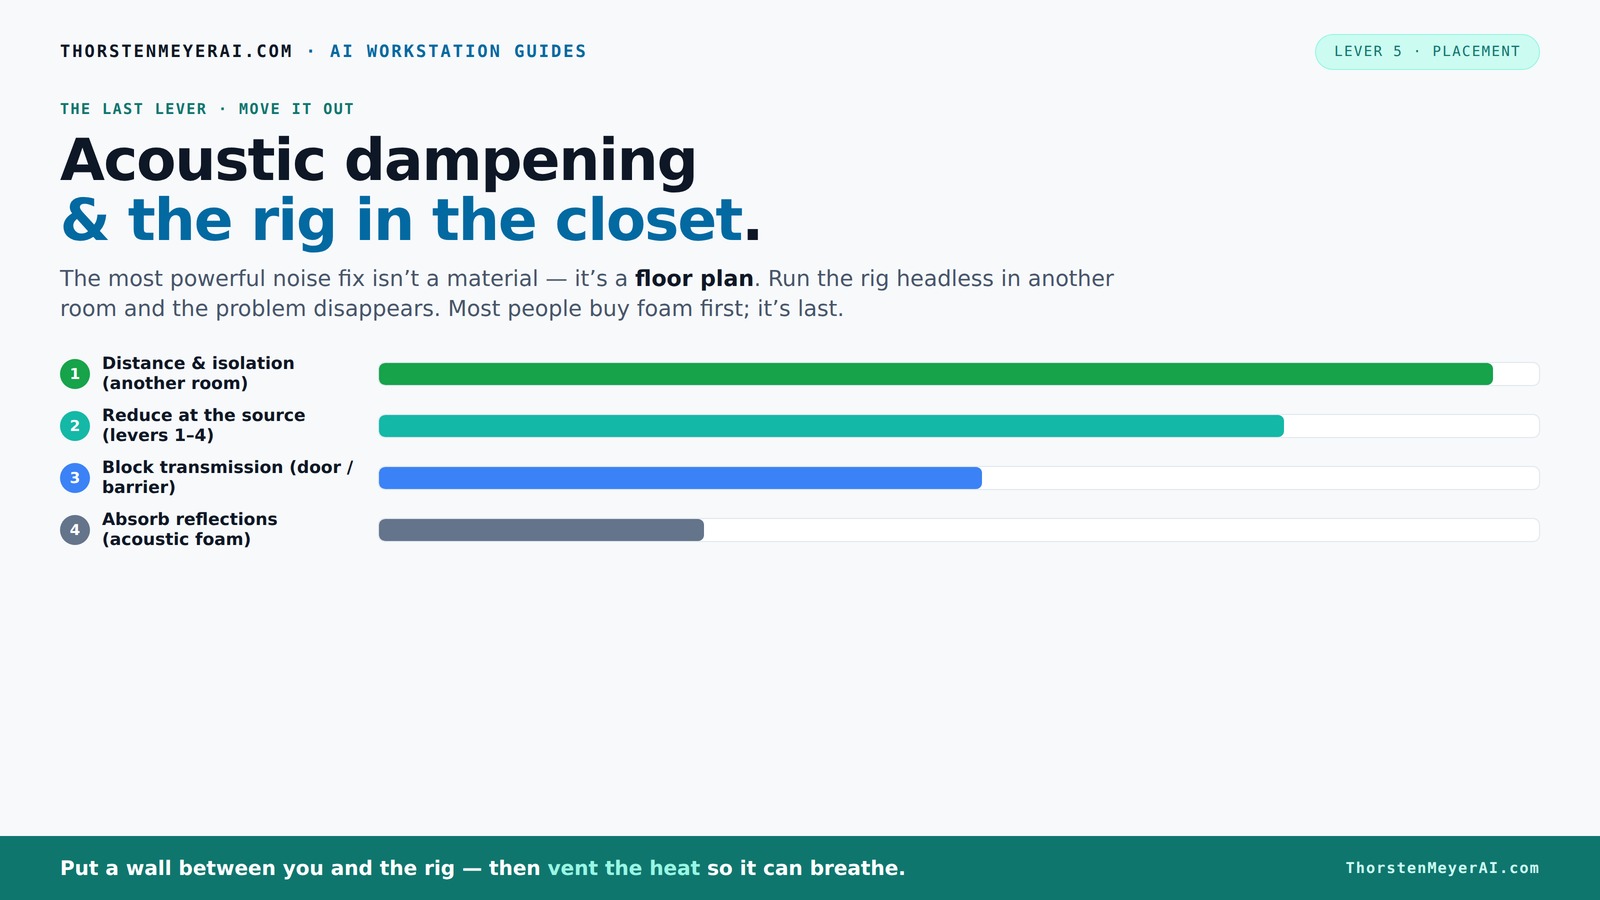
& the rig in the closet.
The most powerful noise fix isn’t a material — it’s a floor plan. A rig you can’t hear because it’s in another room beats any amount of foam. Tap the approaches in Part 1 to see what actually works.
(another room)
(levers 1–4)
(door / barrier)
(acoustic foam)
Contain the noise, not the heat
Key Takeaways
- Focus first on sealing gaps and adding mass if you want real soundproofing.
- Placement of panels at reflection points boosts clarity more than random coverage.
- Clothes, blankets, and rugs are surprisingly effective for budget acoustic treatment.
- Moving your rig into a closet with ventilation can be the best noise solution, not foam.
- Manage heat with passive vents or exhaust fans—trapped heat kills gear and increases noise.

Focusound 52 Pack Acoustic Foam Panels 1" x 12" x 12" Sound Proof Foam Panles Soundproofing Noise Cancelling Wedge Panels for Home Office Recoding Studio with 300PCS Double-Side Adhesive
Soundproofing - Acoustic foam panels triangular grooves structure for better noise absorption, helps to reduce and absorb unwanted...
As an affiliate, we earn on qualifying purchases.
As an affiliate, we earn on qualifying purchases.
What’s the real difference between dampening, treatment, and soundproofing?
Acoustic dampening reduces echoes and flutter inside a space, making the sound clearer and less muddy. Acoustic treatment involves strategically placing panels where reflections bounce, especially at reflection points, to improve sound quality. Soundproofing, on the other hand, blocks sound from escaping or entering, requiring mass and sealing cracks.
Understanding these distinctions is crucial because each approach has different implications. Dampening and treatment improve the clarity and quality of your recordings by controlling internal reflections, but they don’t prevent sound from escaping, which is essential if you need to avoid disturbing neighbors or others in your environment. Conversely, soundproofing is about adding mass and sealing gaps, which can be more invasive and costly but necessary for isolation. Recognizing the tradeoffs helps you prioritize your investments and efforts—do you need a quiet space that’s acoustically friendly or a space that doesn’t leak sound at all? Often, a combination of both is ideal, but knowing the purpose guides your choices.

8 Pack - Bass Traps Acoustic Foam Corner, 8''x8''x12'' Black Bass Traps Corner Studio Foam, High Density and Fire-Proof Acoustic Panels Recording Studio Acoustical Treatments
Acoustic Principle- Bass Trap is a kind of sound absorbing structure specially used to absorb specific low-frequency standing...
As an affiliate, we earn on qualifying purchases.
As an affiliate, we earn on qualifying purchases.
Why are closets such tricky spaces for sound, and how do you fix that?
Closets are challenging because their surfaces—hard walls, shelves, and doors—act as reflective surfaces that bounce sound waves around, creating unwanted echoes. Their small size also causes bass frequencies to build up, resulting in muddied recordings. To fix this, it’s not just about adding panels but understanding the physics of sound in small, reflective spaces. Absorbing early reflections with panels reduces flutter echo, but addressing low-frequency issues requires bass traps placed in corners, where bass tends to accumulate. Sealing gaps prevents sound leaks, which is critical if you’re trying to keep noise contained. Additionally, adding soft furnishings like clothes and blankets isn’t just makeshift; it’s a practical way to increase absorption and reduce reflections. The tradeoff is that over-treating can make your space feel dull or dead, so it’s about finding the right balance. The goal is a controlled environment where sound is clear and natural for recording or mixing, without unwanted echoes or leaks.

Audimute Soundproofing Acoustic Door Seal Kit - Door Sweep and Seal - (Large Size)
Includes (2) Door Seals (3/16" x 1/2" x 50') and (1) Door Sweep (1/2" x 1.5" x 25').
As an affiliate, we earn on qualifying purchases.
As an affiliate, we earn on qualifying purchases.
Where should you place acoustic panels inside a closet for maximum effect?
Placement is crucial because even the best panels won’t help if they’re not in the right spots. Reflection points are where sound waves bounce directly into your mic or ears, causing flutter echo and coloration. Using a mirror held against the wall can help locate these points—any spot where you see the reflection of your microphone or speakers is a prime candidate for treatment. Installing panels at these points disrupts the reflections early, preventing them from reaching your mic or ears and improving clarity significantly. Treating the wall behind your mic or speakers is also vital, as it’s a major source of internal reflections. Ceiling treatment can help if you notice echo or flutter there, especially if your ceiling is reflective. Covering about 20-40% of wall surface with panels at these key points often provides a good balance between effectiveness and not over-dampening the space. Proper placement ensures you’re addressing the actual reflection paths, not just randomly placing panels, which maximizes your investment and improves sound quality dramatically.

Fanspex 6" Shutter Exhaust Fan, 258CFM Window or Wall Mount Ventilation Fan for Greenhouse, Attic, Garage, Bathroom, Kitchen
Shutter Exhaust Fan: This 6-inch shutter exhaust built with sturdy ABS frame body, high quality motor, high quality...
As an affiliate, we earn on qualifying purchases.
As an affiliate, we earn on qualifying purchases.
Budget-friendly tricks: using clothes, blankets, and rugs for sound control
If you’re renting or on a tight budget, soft furnishings are your best allies. Thick blankets, rugs, and clothing absorb sound reflections and reduce echo naturally, making your space more acoustically friendly without permanent modifications. Hanging a quilt or moving blankets behind your mic creates an effective barrier against room reflections, especially in small spaces. Filling your closet with garments isn’t just convenient; it’s a strategic choice because fabric and soft materials increase absorption across a broad frequency range, especially mid and high frequencies. These materials also dampen high-frequency flutter echo, making your recordings clearer. The tradeoff is that soft furnishings won’t do much for low-frequency buildup, so for bass issues, additional treatments like bass traps are necessary. The main advantage is flexibility—you can easily add or remove these elements as your needs evolve, making them ideal for temporary or budget-conscious setups. Properly placed, they can turn a reflective, echo-prone closet into a surprisingly controlled environment.
Sealing gaps and adding mass: the key to actual soundproofing
Adding acoustic panels alone isn’t enough to prevent sound from escaping your closet. For real soundproofing, sealing all gaps around the door, vents, and any openings is essential. Using weatherstripping or acoustic sealant creates a tight barrier, preventing sound leaks that undermine your efforts. The addition of mass—such as extra drywall, damping mats, or mass-loaded vinyl—further reduces the transmission of sound through walls and doors. These materials work by increasing the density and damping vibrations, making it harder for sound waves to pass through. The tradeoff is that these modifications can be invasive or costly, but they’re the most effective way to achieve significant isolation. For example, sealing the door edges with weatherstripping can cut noise leaks by over 50%, and adding a second drywall layer or mass-loaded vinyl can dramatically boost isolation. The key is understanding that soundproofing isn’t just about absorbing sound inside but about blocking its exit—this often requires a combination of sealing, mass, and structural modifications.
Cooling and ventilation: don’t let heat turn your closet into a sauna
Placing a high-performance rig in a sealed closet sounds ideal for noise control, but heat buildup can quickly turn your space into a sauna, risking damage to your equipment and increasing noise levels. Overheated gear often causes fans to run faster and louder, defeating your noise reduction efforts. To prevent this, incorporate passive vents or install a quiet exhaust fan that moves hot air out without introducing noise. Ducting or small thermostatically controlled fans can help maintain a stable temperature, especially if your rig runs continuously. Using an all-in-one liquid cooling system that directs heat outside the closet can dramatically reduce internal temperatures, ensuring your gear operates efficiently and quietly. Managing heat isn’t just about comfort; it directly impacts your noise levels and equipment longevity. The tradeoff is that proper ventilation adds complexity but is essential for a safe, stable setup. For example, I installed a low-noise exhaust fan that maintained a consistent temperature, preventing overheating during long sessions, and preserving the quiet environment you aim for.
Learn more about reducing heat and noise in a high-power AI workstation.Common mistakes to avoid when setting up your closet booth
- Sealing everything without ventilation — trapped heat kills your gear and can increase noise levels.
- Over-treating small spaces—excessive panels can deaden the sound, making your space feel unnatural and muddying your recordings.
- Relying solely on foam for soundproofing — foam absorbs internal reflections but does little to block sound from escaping.
- Ignoring gaps around doors and vents—these are common leak points that can undo your efforts and compromise your isolation.
- Blocking airflow with no plan for cooling — heat buildup can damage equipment and cause fans to ramp up, increasing noise.
Balancing sound treatment with ventilation and heat management is key. If you ignore these aspects, you risk creating a space that’s either noisy or uninhabitable. Proper planning ensures your closet becomes a quiet, functional workspace without the pitfalls of heat or unwanted leaks.
Should you add a reflection filter or use a closet full of clothes?
Both options serve to reduce reflections, but they do so in different ways. Reflection filters are designed specifically for vocal recordings—they isolate the mic from room reflections, providing a controlled, dead environment that enhances vocal clarity. They’re especially useful if you don’t want to treat the entire space or if space is limited. Filling the closet with clothes and blankets offers broader absorption, naturally reducing room echo across a wider frequency range. This approach is more versatile because it improves overall room acoustics, not just for vocals. Combining both—using a reflection filter along with a closet filled with garments—can deliver superior vocal clarity while maintaining a natural, balanced room tone. The tradeoff involves cost, convenience, and the type of recordings you do. If you primarily record vocals and need maximum isolation, a reflection filter suffices. For more general-purpose recording and room tone reduction, filling the space with clothes and blankets provides a flexible, cost-effective solution.
How much treatment do I really need? Is 20% coverage enough?
The amount of treatment depends on your goals and the specifics of your space. For general recording purposes, covering about 20-40% of the walls with panels at reflection points usually offers a noticeable reduction in echo and flutter, making your recordings clearer and more natural. However, this coverage isn’t a one-size-fits-all; in very small spaces like closets, even less coverage combined with soft furnishings can make a significant difference. For serious sound isolation, focus first on sealing gaps and adding mass—these are more effective for blocking sound transmission than treatment alone. The key is understanding the tradeoff: more treatment improves sound quality but can make the space feel dead or overly dampened. Finding the right balance involves testing different levels of coverage and adjusting based on your specific needs. For example, I started with just 15% coverage and gradually added panels and blankets until I achieved the desired clarity without sacrificing liveliness or comfort.
Conclusion
If your goal is quiet, smart placement and sealing are your best friends. A closet can be a goldmine for a home studio—if you treat it right and keep it cool. Remember, noise reduction isn’t just about absorbing sound; it’s about controlling it from the source to the exit.
Imagine your setup humming softly behind a sealed door, while your workspace stays silent. That’s the power of good placement, proper treatment, and smart ventilation. Your perfect home studio might be just a closet away.