This guide helps beginners choose a compact folding exercise bike, set it up at home, adjust it for a comfortable ride, and fold it away for storage. Allow 1-2 hours for measuring, comparing models, assembly, and a short test ride. Follow the bike maker’s instructions whenever they differ from general guidance here.

Get workout gear delivered free with Prime
- Fast, free delivery on millions of items
- Prime Video, Amazon Music and more included
- Member-only deals all year

BARWING Foldable 5-in-1 Stationary Exercise Bike
- ✔ Resistance: 16 levels of magnetic resistance
- ✔ Flywheel: 5.5 pounds
- ✔ Seat adjustment: 8 positions

USLIM 817 Foldable 5-in-1 Exercise Bike with 16-Level Magnetic Resistance
- ✔ Model: USLIM-817
- ✔ Resistance: 16-level magnetic
- ✔ Flywheel: 6.6 pounds
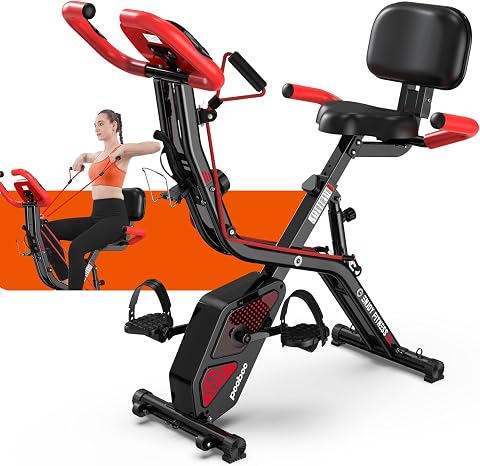
pooboo Folding Magnetic X-Bike Exercise Bike
- ✔ Resistance: 8-level magnetic
- ✔ Workout modes: Upright and semi-recumbent
- ✔ Included accessories: Arm resistance bands, bottle holder, and mobile-device holder
Difficulty: Beginner | Time: 1-2 hours
What You’ll Need
Tools & Materials:
- Tape measure
- Bike maker’s assembly manual
- Basic hand tools listed in the manual
- Flat, stable floor space
Knowledge:
- Ability to follow basic assembly instructions
- Awareness of your height, weight, and available workout space
Check the product listing and manual for the bike’s folded and open dimensions, maximum user weight, height range, and any required tools. Ask another person to help lift a heavy box or steady the bike during assembly.
BARWING Foldable 5-in-1 Stationary Exercise Bike
For a buyer who wants one folding bike to accommodate different workout intensities and rider setups, BARWING offers the most adjustment in this group. Its 16 magnetic resistance levels allow smaller changes in effort than pooboo’s eight levels, and its eight seat positions give more stated fit adjustment than the other listings describe. The listed height range, from 4 feet 11 inches to 6 feet 6 inches, also reaches taller riders than pooboo’s range.The foldable reinforced-steel frame and phone holder suit home workouts where the bike needs to be put away or paired with a screen. BARWING also lists a 5.5-pound flywheel and an under-20-decibel noise level; those are useful claims to compare, though they do not establish how loud it will feel in every room. The key caution is conflicting capacity information: the title states 350 pounds, while the description says 330 pounds. We would resolve that discrepancy with the seller before relying on either figure. Compared with USLIM, BARWING offers more listed seat positions and a higher stated capacity in at least one part of the listing, but USLIM’s supplied details are more consistent and include a warranty term.
Pros:
- 16 magnetic resistance levels offer more adjustment than pooboo’s eight.
- Eight seat positions support more listed seat adjustment.
- Foldable frame and phone holder suit space-conscious home workouts.
- Listed height range extends to 6 feet 6 inches.
Cons:
- Maximum capacity conflicts between 330 pounds in the description and 350 pounds in the title.
- Assembly is required, and no folded dimensions are supplied.
Best for: Buyers who want 16 resistance levels, several seat adjustments, and a listed fit range that includes riders up to 6 feet 6 inches.
Not ideal for: Anyone who needs a confirmed maximum weight capacity or exact folded dimensions before buying.
Bottom line: BARWING is our strongest all-around pick for adjustment and rider range, provided buyers first clarify its conflicting capacity listing.
“BARWING is our strongest all-around pick for adjustment and rider range, provided buyers first clarify its conflicting capacity listing.”
USLIM 817 Foldable 5-in-1 Exercise Bike with 16-Level Magnetic Resistance
USLIM is a close alternative to BARWING for shoppers who want 16 resistance levels in a folding frame but prefer a more internally consistent capacity listing. It specifies a 300-pound maximum, a rider-height range of 4 feet 11 inches to 6 feet 6 inches, and a 12-month warranty. That makes the basic fit and support details easier to assess than BARWING’s conflicting capacity figures, although the warranty description does not explain coverage terms.The bike includes transport wheels, a phone holder, and an LCD display for time, speed, and calories. Its stated 6.6-pound flywheel is heavier than BARWING’s listed 5.5-pound unit, but we cannot use that figure alone to conclude that one ride will feel smoother or more stable. The listing also claims noise under 20 dB and says the bike arrives approximately 70% pre-assembled; some assembly remains. Compared with pooboo, USLIM gives finer resistance adjustment and a broader listed height range, but pooboo offers a semi-recumbent position and arm bands that USLIM’s supplied description does not specify. One compact-storage question remains open: no folded dimensions are listed, so buyers should check whether the bike will fit their intended storage spot.
Pros:
- 16 magnetic resistance levels allow gradual workout adjustments.
- Transport wheels help move the bike between workouts and storage.
- Lists a 300-pound capacity, rider-height range, and 12-month warranty.
- Approximately 70% pre-assembled, with an LCD and phone holder included.
Cons:
- Some assembly is still required.
- The listing does not provide dimensions or folded size.
Best for: Buyers who want 16 resistance levels, wheels for moving the bike, and clearly stated capacity, height, and warranty details.
Not ideal for: Shoppers who need exact folded measurements or a bike with multiple riding positions and included arm bands.
Bottom line: USLIM is a well-specified folding option for buyers who value clear fit details and 16 resistance levels over extra riding positions.
“USLIM is a well-specified folding option for buyers who value clear fit details and 16 resistance levels over extra riding positions.”
pooboo Folding Magnetic X-Bike Exercise Bike
pooboo takes a different route from the two 16-level bikes: it emphasizes two riding positions and upper-body work. Riders can choose upright or semi-recumbent riding, and the included arm resistance bands add an option for working the arms while cycling. That combination suits buyers who want more than one posture or a simple way to vary a home session. BARWING and USLIM offer twice as many listed resistance levels, however, so they are stronger choices for riders who want finer control over pedaling effort.The bike folds for storage and includes transport wheels, a bottle holder, and a mobile-device holder. Its monitor tracks time, speed, distance, calories, and heart rate, giving it more listed metrics than USLIM’s supplied display details. The stated fit range is 4 feet 10 inches to 6 feet 1 inch, which starts slightly lower than the other two bikes but does not reach as tall. Capacity is listed at 300 pounds. The main drawback is limited resistance adjustment; the listing also provides no detailed assembly instructions or warranty information. Compared with USLIM, pooboo offers more workout-position variety, while USLIM has 16 levels and a stated warranty. Choose pooboo for those included movement options, not for maximum resistance granularity.
Pros:
- Offers upright and semi-recumbent riding positions.
- Includes arm resistance bands for adding upper-body movement.
- Folds for storage and has transport wheels.
- Monitor tracks several metrics, including heart rate.
Cons:
- Eight resistance levels provide fewer adjustment steps than BARWING and USLIM.
- No detailed assembly instructions or warranty information are provided.
- The listed maximum rider height is lower than the other two options.
Best for: Riders who want upright and semi-recumbent positions, arm bands, and a monitor that includes heart-rate tracking.
Not ideal for: Buyers prioritizing many resistance steps, riders taller than 6 feet 1 inch, or anyone who needs detailed assembly and warranty information upfront.
Bottom line: pooboo is the most versatile choice for riding position and band-assisted movement, but its eight resistance levels make it less adjustable than its rivals.
“pooboo is the most versatile choice for riding position and band-assisted movement, but its eight resistance levels make it less adjustable than its rivals.”
As an Amazon Associate we earn from qualifying purchases.
Before You Start
Choose a bike based on your intended use and the space available. Compact models can differ in seat adjustment, resistance, display features, and stability. Confirm the bike supports your weight and leg length, and check the maker’s warranty and return terms before buying. Plan for open space around the bike while riding; a bike that fits folded into a closet still needs room to unfold and pedal safely.
Keep children and pets away during assembly and testing. Do not use the bike if parts are cracked, fasteners are missing, or the frame does not lock into position.
Step-by-Step Instructions
Step 1: Measure the storage and riding spaces
Measure the place where you plan to store the folded bike, including doorway width and any closet opening. Then measure a clear riding area on a level floor. Compare both spaces with the maker’s folded and open dimensions, and leave room to mount, dismount, and move the pedals without hitting a wall or furniture.
Tip: Use the bike’s stated dimensions rather than guessing from product photos. Check whether the display, seat, or pedals stick out beyond the frame when folded.
Check: The folded bike fits through the route to its storage spot, and the open bike has clear space around the seat and pedals.
Step 2: Compare models against your needs
List the features you will use, such as adjustable resistance, a padded seat, transport wheels, or a basic workout display. Compare models for user weight limits, recommended height range, fold-and-lock design, warranty, and replacement-part availability. Read the manual or reliable owner feedback for details about assembly and storage.
Tip: A display is optional. Prioritize a frame that feels stable and fits your body over extra features you are unlikely to use.
Check: You have selected a model that meets the maker’s height and weight guidance and fits both measured spaces.
Step 3: Inspect the package and parts
Open the package on a clear surface and match the parts with the manual’s inventory. Look over the frame, hinges, seat, pedals, cables, and fasteners for damage. Set small parts in a tray or bowl so they do not roll away, and identify any tools the manual requires before assembly.
Tip: Do not discard packaging until the bike is assembled and tested in case you need to return a damaged or incomplete item.
Check: All listed parts are present, and there are no visible cracks, bent components, or damaged cables.
Step 4: Assemble the frame and fittings
Follow the manual in its stated order, keeping the bike on a stable floor. Attach the stabilizers, frame sections, seat, pedals, and console as directed. Tighten each fastener to the specified setting if one is given; otherwise, tighten securely without forcing or cross-threading it. Check pedal markings because left and right pedals may use different thread directions.
Tip: Do not substitute fasteners or skip a step. If a bolt will not turn smoothly by hand at first, back it out and realign the parts before using a tool.
Check: The frame is assembled, all required fasteners are installed, and the pedals and seat are attached in the positions shown in the manual.
Step 5: Open and lock the bike
Move the assembled bike to the planned workout area. Open the frame using the manual’s procedure, and engage every hinge pin, latch, or locking knob. Give the frame a gentle push from the side to check for movement before sitting down.
Tip: Keep fingers clear of folding joints. Never ride while a hinge is partly closed or a lock is loose.
Check: The frame stands on all intended contact points and stays open when gently nudged.
Step 6: Adjust the seat and handlebars
Set the seat height using the manual’s adjustment marks and limits. Sit on the bike and place your feet on the pedals. At the bottom of a pedal stroke, your knee should remain slightly bent rather than fully locked; adjust the seat if needed. Set the handlebars so you can hold them without reaching uncomfortably, then tighten the adjustment knobs.
Tip: Stay within the seat post’s maximum extension mark. If the seat cannot be set to a comfortable height within the marked range, this model may not fit you.
Check: You can pedal through a full turn with a slight bend in the extended leg and hold the handlebars without straining.
Step 7: Check resistance and moving parts
Turn the resistance control through its available range, then return it to a low setting. Check that the pedals rotate freely, straps hold your feet without pinching, and the display or power connection works if included. Tighten any adjustment that the manual identifies as user-maintainable.
Tip: Stop if you hear scraping, feel a sudden catch, or notice the frame shifting. Do not open the resistance housing unless the manual specifically instructs you to service it.
Check: The pedals move smoothly, resistance changes as intended, and the bike remains stable.
Step 8: Take a short test ride
Mount carefully, start at the lowest resistance, and pedal slowly for several minutes. Keep your feet centered on the pedals and your back in a comfortable position. Increase resistance only if the bike remains stable and the motion feels smooth. Stop and inspect the bike if a joint shifts, a fastener loosens, or an unusual noise appears.
Tip: Use the bike on a dry, level floor. A mat can protect the floor, but it should not make the bike rock or slide.
Check: You can pedal at a gentle pace without wobbling, slipping, painful reaching, or unexpected noise.
Step 9: Fold and store the bike
Finish pedaling and wait for the moving parts to stop. Follow the manual to release the frame lock and fold the bike, keeping hands away from the hinge. Secure the folded lock or strap if provided, then roll or carry the bike using its designated handles. Store it where it cannot tip or block an exit.
Tip: Do not lift the bike by the display, cables, or seat adjustment parts. Check the manual for safe lifting points and weight.
Check: The bike stays folded and stable in storage, and it can be moved without pulling on cables or pinching fingers.
Common Mistakes to Avoid
- Buying based only on folded dimensions. — Compare the open footprint too, and allow room for mounting, dismounting, and pedal movement.
- Riding before the frame lock is engaged. — Check every hinge pin or latch and gently test the frame before sitting down.
- Overextending the seat post to reach a comfortable leg position. — Stay below the maximum extension mark; choose a model with a suitable height range if the fit is still wrong.
- Forcing a pedal or bolt that does not thread smoothly. — Stop, check the left/right marking or alignment, and restart by hand before tightening with a tool.
Troubleshooting
Problem: The bike rocks during pedaling.
Solution:
Stop riding. Move the bike to a level surface, confirm all stabilizer feet touch the floor, and check that assembly fasteners and frame locks are secure. Contact the maker if the frame still rocks or a part appears bent.
Problem: The pedals scrape or catch.
Solution:
Stop and check for packaging material, an incorrectly fitted pedal, or contact between the crank and frame. Refit parts only as the manual directs. If the resistance mechanism still catches, request service rather than opening the housing.
Problem: The seat will not stay at the chosen height.
Solution:
Dismount and check that the adjustment pin is fully seated in a hole and the knob is tightened. Do not ride if the seat slips; contact the seller or maker if the mechanism will not lock.
Problem: The display does not turn on.
Solution:
Check the battery orientation or power connection shown in the manual. Inspect the console cable for a loose plug or damage. If the display remains blank, contact the maker for model-specific support.
What Success Looks Like
The completed bike opens and locks securely, sits steadily on a level floor, fits your body within its marked adjustment limits, and pedals smoothly at low resistance. You can complete a short test ride without unexpected noise or movement, then fold and store the bike using the maker’s procedure.
Next Steps
After the first few rides, check the fasteners and folding lock again as directed by the manual. Wipe sweat from the frame and seat, keep the bike dry, and store it with the lock secured. Follow the maker’s maintenance schedule and contact support for persistent noise, slipping, or damage.
Frequently Asked Questions
How much space does a compact folding exercise bike need?
Use the specific model’s open and folded dimensions. Leave additional clear floor space for mounting, dismounting, and pedal movement, then check that the folded bike can pass through doors to storage.
Can I use a folding exercise bike every day?
Follow the maker’s usage and maintenance guidance. Start with a pace and duration that feel manageable, and stop if the bike shifts or produces unusual sounds.
How should the seat fit?
At the bottom of a pedal stroke, your knee should have a slight bend. Keep the seat post within its marked range; a bike that cannot reach a comfortable position may not suit your height.
Do I need a mat under the bike?
A mat can protect flooring and catch sweat, but it is optional. Use one only if the bike remains level and does not rock or slide on it.
What should I do if the bike is noisy after assembly?
Stop pedaling and check the assembly against the manual, including pedal direction and fastener tightness. If the noise continues or the resistance catches, contact the maker instead of opening the mechanism.
Fall Picks
fall essentials
As an affiliate, we earn on qualifying purchases.